
How to Check Oil and Other Fluids
Difficulty: Easy
Duration: 5-10 minutes
How often: See each case below
To keep your vehicle running smoothly, it’s important to check fluid levels regularly. Checking fluids only takes a few minutes. Learn how to check oil and other fluids by following the steps below. If you have any questions, please contact your nearest NAPA AutoCare Center.
CHECKING OIL
Under normal driving conditions, you should change your oil every 3,000 to 5,000 miles. Consult your owner’s manual for your vehicle’s specific needs.
Step 1
Park your car on level ground, turn the engine off and remove the keys.
Step 2
Open the hood of your car and secure it with the prop rod. Locate the dipstick; it’s usually labeled “Oil”.
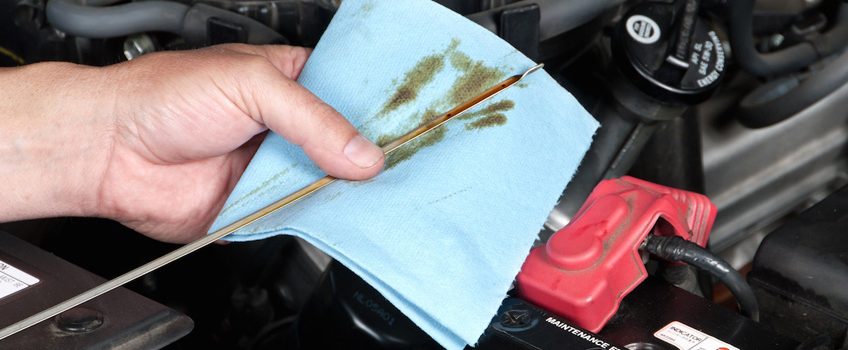
Step 3
Remove the dipstick and wipe it clean. Return the dipstick to the tube, then remove it again and check the level of motor oil on the stick. If the level is below the minimum indicator, you need to add oil to your car.
Step 4
Check the color of the oil on the dipstick. Motor oil is usually a light clear fluid but will darken under normal conditions. If the oil is black, it should be changed along with the oil filter. If the oil is light brown and milky, this could indicate a coolant leak into the crank case.
Step 5
Feel the oil on the dipstick. If the oil feels gritty, change the oil.
Step 6
Smell the dipstick. If the oil has an odor of gas, it could indicate that the engine, fuel system or ignition system needs to be serviced.
More from Team Valvoline:
What is Motor Oil and Why do You Need It?
Why Is There More Than One Type of Motor Oil?
CHECKING TRANSMISSION FLUID
Step 1
Pull out the transmission fluid dipstick located at the back of the engine near the firewall. Wipe it off, replace it and pull it out again. Check the level against the markings at the bottom of the dipstick. A low level should be addressed immediately with a transmission specialist.
Step 2
Check the color of the fluid; it should be clear pink. Any darkness means it’s time for a fluid and filter change.
Some vehicles no longer have a transmission dipstick and need to be checked by an automotive professional. Check your owner’s manual for details. Manual transmissions’ oil levels should be checked by a NAPA AutoCare Center when the engine oil is changed.
More from Team Valvoline:
The Ins and Outs of the Automatic Transmission and the Fluid That Keeps It Going
Choosing the Right ATF for Your Vehicle
IMPORTANT TRANSMISSION FLUID TIPS:
- Your car should be running when you check the transmission fluid level. Set the emergency brake and put the car in park when checking under the hood.
- If you prefer, bring your car to your local NAPA AutoCare Center. Your professional service technician can check your fluid levels and perform any necessary fluid and filter changes.
- Always be sure you are using the correct transmission fluid. Using the wrong fluid can severely damage the unit. Check your owner’s manual for your vehicle’s specifications.
CHECKING BRAKE FLUID
Check your owner’s manual to determine how often you should check your brake fluid. Checking brake fluid once a year is usually sufficient.
Step 1
Find the vehicle’s brake fluid reservoir. They are normally located on top of the engine and are labeled.
Step 2
Clean the area around the cap with an approved aerosol cleaner before removing the cap. Any particles of dirt that fall in the fluid may result in a costly service.
Step 3
Open the cap and check the fluid level on the dipstick that is attached to the underside of the cap. If the fluid level is low, have the car serviced at a NAPA AutoCare Center soon. Otherwise, it could lead to a larger problem. Never used old steering or brake fluids. Once opened and exposed to air and moisture, these fluids cannot perform the required functions and can harm the system.
Note: In some older vehicles, you need to check the master cylinder to check the fluid level. The master cylinder is a small metal box with a removable lid.
CHECKING COOLANT
Coolant should be changed every 30,000 miles or every two years as a general rule. Check your owner’s manual to see what is recommended for your vehicle.
Step 1
Locate the coolant reservoir under the hood of the car. See your owner’s manual for the exact location. Some cars only have an exposed cap.
Step 2
Check the fluid level. On the side of the reservoir, there are markings that show fluid levels. If the level of the liquid is low, add more of the proper coolant mix.
More from Team Valvoline:
What is Coolant and Why do I Need It?
How Does Coolant Actually Work?
IMPORTANT TRANSMISSION FLUID TIPS:
- Never open the radiator cap on a hot engine. Allow it to cool for 15 to 20 minutes before opening.
- If you prefer, bring your car to your local NAPA AutoCare Center. Your professional service technician can check your fluid levels and perform any necessary fluid and filter changes.
CHECKING BATTERY LEVEL
Most batteries have a three-to-five-year life span, but they can last longer with maintenance, including checking their fluid level.
Step 1
Look for the battery’s condition indicator, a visible window on the top of the battery that changes color.
Green/blue: Good
Red: Add distilled water
White: Needs charge
Check your owner’s manual or label on the battery for further information. The condition indicator should not be the only test done to determine if the battery is serviceable.
Step 2
If the battery needs more fluid, pour in a little at a time until the level reaches the top of the battery grids. Do not overfill. Always use distilled water, not tap or filtered water, to avoid contamination.
More from Team Valvoline:
How Do Batteries Work?
A Breakdown of Automotive Batteries
IMPORTANT BATTERY FLUID TIPS:
- Certain batteries (maintenance-free) are sealed, and it is not possible to add fluid to them.
- Not all batteries are in the same place. Some batteries are located under the rear seat, in the trunk or in the front inner fender.
- Any time a battery is serviced, safety gloves, eye protection and fender protection should be used to prevent injury and damage to paint.