BLOG

on

How to Maintain Tires

Difficulty: Easy
Duration: 5-10 minutes
How often: Once every month plus before and after road trips

Maintaining good tires help improve your car’s gas mileage, improve tire life, and give a smoother ride. It is vital that you consistently inspect your tires for pressure and wear to make sure that your vehicle is safe. By following the steps below, you can learn how to maintain tires, saving you money and helping your vehicle operate at its best.

Things you’ll need from your garage or your local NAPA AUTO PARTS Store:

  • Tire gauge
  • Tread depth gauge (or a penny)
  • Air compressor

CHECK FOR TIRE WEAR

The tires are the only contact that your car has with the road, so proper maintenance is essential to safe driving. Check your tires for wear at least once a month as well as before and after road trips. There are many factors that contribute to wear on tires. Measuring your tires’ tread will help determine whether it is time for tire adjustments or replacement.

Step 1

Locate the wear bars between the tire treads. The wear bar is a narrow bridge of rubber in the groove, spanning individual tread blocks. If the tread is worn down level with the wear bar or close, the tire should be replaced.

Step 2

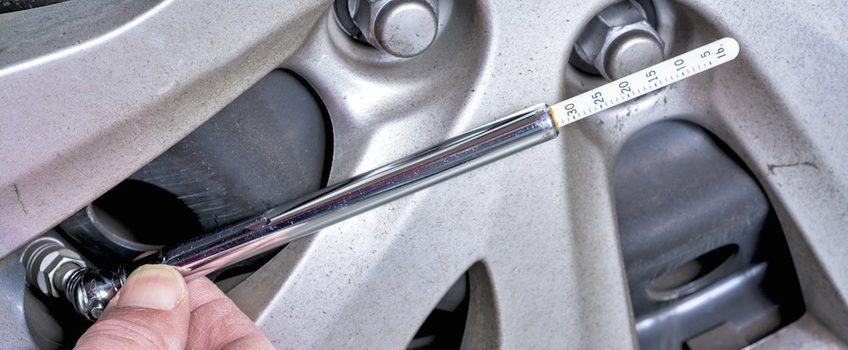
Use a tread depth gauge or a penny to more accurately measure wear across each tire, checking four points per tire. Place the metal rod of the tire depth gauge in the groove and push the casing down until it touches the tire. Check the depth reading. If it reads 2/32″ or less, replace the tire. If you do not have a tread depth gauge, insert a penny into the groove of the tread with Lincoln’s head face down. If you see the top of Lincoln’s head, replace the tire.

Step 3

Look for uneven wear across the tire and from one tire to another. If one or more tires is wearing unevenly across its tread or compared to the other tires, you may have low tire pressure or a problem with your tires or suspension system. Have a professional diagnose and repair any balance or alignment issues, and regularly rotate your tires to ensure even wear.

CHECK TIRE PRESSURE

Before you begin to assess your tires, make sure that they are cool. This ensures a more accurate reading, as pressure increases with heat. Tires automatically lose pressure through time and bumps and hard surfaces you encounter while driving. Recommended pressures vary, so check your owner’s manual or a label in the driver door jamb for the recommended tire pressure for your vehicle.

Step 1

Make sure your tires are cool prior to inspection. Park your car on a flat surface to get the most accurate reading.

Step 2

Remove the cap from the valve of your tire. Press the tire gauge on the valve to determine pressure. You may have to press hard to ensure that you have it inserted correctly. If you hear any air escaping, the valve is not correctly seated into the gauge. Compare the reading with the recommended tire pressure.

Step 3

If you determine that a tire needs air, insert the air pump into the valve and fill it to its recommended pressure level. If you have over-filled it, don’t worry. You can release air from your tire by pushing on the metal needle in the center of the valve stem with a fingernail or pen tip. Most tire gauges also include a tool or feature to let air out of the tire.

Step 4

Once the air has been adjusted to the proper level, replace the cap. Check the remaining tires in the same fashion.


IMPORTANT TIPS:

  • Check your tires for wear at least once a month and before and after road trips.
  • When checking tire pressure, make sure tires are cool and your car is parked on a flat surface to get the most accurate reading.
  • If your tires have green valve stem caps, the tires are filled with nitrogen. Instead of using atmospheric air from a compressor, return to the facility that filled your tires – or any shop offering nitrogen – to have them refilled. (See note regarding nitrogen below.)
  • Check your owner’s manual or ask your local mechanic for tire rotation recommendations. Rotating tires every 10,000 miles is a good rule of thumb.

Note: If you’re not already using nitrogen in your vehicle’s tires, consider making the switch. Offered in many auto care facilities, nitrogen increases your fuel economy, extends tire life and helps your vehicle ride more smoothly. Nitrogen is an inert gas with a larger molecule than oxygen, so it does not escape the tires as easily as regular air. It runs cooler and is affected less by changes in outside temperature. Regular air changes 1psi for every 10-degree temperature change, meaning a 40-degree change from morning to afternoon will have a 4psi difference just during the day. This change could trigger a warning in a vehicle equipped with a Tire Pressure Monitoring System (TPMS).

on

What does the Variable Valve Timing (VVT) System do?

Variable Valve Timing (VVT) systems are designed to reduce emissions and maximize engine performance and fuel economy. Variable Valve Timing (VVT) systems utilize oil pressurized solenoids and camshaft phasing sprockets to change the timing of a valve lift event throughout the engine RPM range.

Why would the Variable Valve Timing (VVT) System fail?

Every Variable Valve Timing (VVT) system is slightly different, but there are general guidelines to follow to ensure proper performance: Regularly service the engine oil and filter and use the manufacturer’s required engine oil type. When oil change intervals are extended beyond the recommended manufacturer’s guidelines, engine oil sludge can clog critical oil passageways and create failure prone conditions. Material or electrical malfunctions from regular usage can also contribute towards Variable Valve Timing (VVT) System failure.

How to determine if the Variable Valve Timing (VVT) System is malfunctioning?

The check engine light (CEL) will be activated when the powertrain control module (PCM) detects unordinary engine conditions. A poor performing or failed Variable Valve Timing (VVT) system will result in poor engine idle/stalling, increased engine noise and reduced power output. Engine codes can vary from year/make/model and can include the following:

Check Engine Light (CEL) OBDII CodesPotential Diagnosis
P0010Camshaft Position Actuator Circuit Bank 1
P0011Camshaft Position Timing Over-advanced or System Fault Bank 1
P0012Camshaft Position Timing Over-retarded Bank 1
P0013Camshaft Position Actuator Circuit Bank 1
P0014Camshaft Position Timing Over-Advanced or System Fault Bank 1
P0015Camshaft Position Timing Over-Retarded Bank 1
P0020Camshaft Position Actuator Circuit Bank 2
P0021Camshaft Position Timing Over-Advanced or System Fault Bank 2
P0022Camshaft Position Timing Over-Retarded Bank 2
P0023Camshaft Position Actuator Circuit Bank 2
P0024Camshaft Position Timing Over-Advanced or System Fault Bank 2
P0025Camshaft Position Timing Over-Retarded Bank 2
P1349Variable Valve Timing System Malfunction Bank 1


Where are the Variable Valve Timing (VVT) System components located?

Inside the engine compartment the Variable Valve Timing (VVT) parts are found on or around the cylinder head block and timing chain/belt cover and may require the removal of electrical plugs and access to the engine camshaft timing system.

Advantages of using a NAPA OE Solutions Variable Valve Timing (VVT) Replacement Unit are:

  1. Complete control of the manufacturing process from componentry to finished product to ensure long-life.
  2. Engineered to meet or improve upon OE specifications which ensures optimal performance and installation.
  3. NAPA OE Solutions Variable Valve Timing (VVT) repair parts are backed by a Limited Lifetime Warranty.
  4. Broad applications coverage for most vehicles equipped with VVT systems.
  5. Value added components such as O-rings, seals, and hardware are included for a wide range of vehicle applications.

Read more about hydraulic systems, vvts and engine lubrication basics on our Know How Blog

on

What does a Manifold Absolute Pressure (MAP) Sensor do?

photo of manifold absolute pressure or map sensor, NAPA Manifold Absolute Pressure Sensor CRB227024

The MAP sensor converts engine vacuum or manifold pressure to an electrical signal so the powertrain control module (PCM) knows how much load the engine is under. This data is the basis for fuel delivery and timing control.

Will a malfunctioning Manifold Absolute Pressure (MAP) Sensor affect vehicle operation?

Yes, a failing sensor can illuminate the check engine light or malfunction indicator lamp, and may cause the engine to have a rich or lean fuel mixture condition which will commonly affect engine performance.

What are the common causes of Manifold Absolute Pressure (MAP) Sensor failure?

Typically these sensors fail due to moisture entering the sensor when the engine is off and due to normal wear of the sensor element.

How to determine if the Manifold Absolute Pressure (MAP) Sensor is malfunctioning?

The Diagnostic Monitor tests for voltages outside of the normal range. The powertrain control module (PCM) also compares actual MAP output to calculated values to determine sensor performance deterioration. The calculated values are based on throttle position and various engine load factors.

Check Engine Light (CEL) OBDII CodesPotential Diagnosis
P0105MAP/Barometric Pressure Circuit
P0106MAP/Baro Pressure out of range
P0107MAP/Baro Pressure Low Input
P0108MAP/Baro Pressure High Input
P0109MAP/Baro Pressure Circuit Intermittent


Advantages of using a NAPA Echlin Manifold Absolute Pressure (MAP) Sensor Replacement Unit are:

  1. Complete control of the manufacturing process from componentry to finished product to ensure long-life.
  2. Engineered to OE specifications and fitment to ensure a precise PCM signal and easy installation.
  3. NAPA ECHLIN MAP sensors are backed by a 3 year/36,000 mile warranty.

Read more about map sensors on our Know How Blog

on

What does an Anti-Lock Brake (ABS) System do?

anti lock brake system sensor at NAPA Auto Parts

The anti-lock braking system (ABS) uses a sensor to monitor the wheel speed and send this information to the ABS computer. The ABS computer uses this information to prevent the brakes from locking during an emergency stop. If wheel speeds are not equal, the computer modulates the anti-lock feature until the speeds are equalized.

Will a malfunctioning Anti-Lock Brake System (ABS) Sensor affect vehicle operation?

Yes, a failing sensor can illuminate the malfunction indicator or ABS warning lamps, and may cause failure of the anti-lock braking system to operate safely and properly.

What are the common causes of Anti-Lock Brake Sensor (ABS) Sensor failure?

Typically these sensors will fail as a result of clogging from metallic debris, brake dust or dirt due to exposure to the harsh elements.

How to determine if the Anti-Lock Brake Sensor (ABS) is malfunctioning?

An ABS sensor can be visually inspected and the wire winding and sensor harness can be tested for opens, shorts and proper factory specified resistance with an ohmmeter.

Advantages of using a NAPA BRAKES Echlin Anti-lock Brake System (ABS) Sensor Replacement Unit are:

  1. Complete control of the manufacturing process from componentry to finished product to ensure long-life.
  2. Engineered to OE specifications and fitment to ensure a precise ABS signal and easy installation.
  3. NAPA BRAKES ECHLIN ABS sensors are backed by a 3 year/36,000 mile warranty.